Live Streaming with Wowza and Roku
(Updated 3/2/2015 for Wowza 4.1 on EC2)
Wowza is a media server
that provides live
and on-demand video streams
for web sites, Roku players, and other streaming devices.
This walk-through is intended to provide a quick introduction to
live streaming using Wowza and Instant TV Channel.
It will cover setting up Wowza Media Server on Amazon EC2
("Elastic Compute Cloud")
to provide a live single-bitrate stream to be displayed within a Roku channel.
Adobe Flash Media Live Encoder will be used to encode and transmit the stream to Wowza.
Advanced features such as multi-bitrate streams and transcoding will not be covered here,
but can be added easily using the Wowza Streaming Engine Manager.
Instead of setting up your own Wowza Media Server on Amazon EC2,
you may want to consider using ScaleEngine,
a CDN (Content Delivery Network) that provides live streaming services.
ScaleEngine is familiar with Instant TV Channel and can assist with configuring
live streams for your Roku channel as well as for other platforms.
If you decide to use ScaleEngine to provide your live streams,
you'll still need to set up Flash Media Live Encoder (or equivalent) as described below
in order to send your live stream to ScaleEngine for distribution.
Prerequisites for Live Streaming using Amazon EC2:
-
An Instant TV Channel account with a non-public channel installed on a Roku player for testing.
(See
this walk-through
if you don't have a non-public test channel installed yet.)
-
An Amazon AWS account.
-
A capture device such as a video camera or webcam
installed on a Mac or Windows-based encoding workstation or laptop.
Video and audio signals are both required for input to the encoder.
Cost for Live Streaming using Wowza and Amazon EC2:
-
Instant TV Channel account: Free
-
Adobe Flash Media Live Encoder: Free
(Wirecast can be used instead of Adobe Flash Media Live Encoder, approximate cost is $500.)
-
MainConcept AAC Encoder Plug-in: $180
(One-time purchase, Windows only, not needed for Mac.)
-
Wowza: $15.00 per month plus usage charges for Wowza Streaming Cloud or $65.00 per month for Wowza Streaming Engine.
Wowza offers a 30-day free trial for Wowza Streaming Cloud and a 180-day free trial for the Wowza Streaming Engine.
-
Amazon AWS EC2: Cost is built into Wowza Streaming Cloud usage charges.
For Wowza Streaming Engine there is a separate AWS charge that varies depending on the instance (server) size selected.
For testing, we will use an AWS EC2 t1.small instance which is the smallest server size that is compatible with Wowza.
Cost for an AWS EC2 t1.small instance is $0.044/hour.
-
Amazon AWS S3: Cost is built into Wowza Streaming Cloud usage charges.
For Wowza Streaming Engine the S3 cost is approximately $0.09 (9 cents) per GB.
One hour of HD 720p video streamed to one player will use approximately 1 GB of S3 bandwith.
-
Testing a single Roku player with a Wowza free trial, an EC2 t1.small instance, and a 720p stream will typically cost about 15 cents per hour,
not including any bandwidth charges from your ISP.
OK, let's begin...
Adobe Flash Media Live Encoder (FMLE)
-
Browse to www.adobe.com/go/fme.
-
Download Flash Media Live Encoder (Mac or Windows) to your encoding workstation or laptop.
FMLE is free, but you may be required to register your email address before downloading it.
-
Install FMLE and test with your video capture device.
-
Do not click Start or Connect yet.
We will complete the connection to the Flash Media Server
and start the encoder at a later step.
-
Be sure to review Adobe's EULA for any streaming restrictions.
Wowza Streaming Engine or Streaming Cloud
-
Browse to www.wowza.com/pricing.
-
Review the available plans, then sign up for a 180-day free trial of Wowza Streaming Engine
or a 30-day free trial of Wowza streaming cloud.
-
Browse to the Wowza Quick Start Guide at www.wowza.com/forums/content.php?22-quick-start-guide.
-
Follow the Wowza Quick Start Guide to set up a Wowza Streaming Engine or Streaming Cloud instance on Amazon EC2.
(An "instance" is a virtual server, running on Amazon's cloud infrastructure.)
-
Write down the EC2 instance's public domain name (or IP address) and Instance ID.
These values will be needed in later steps.
-
Note that the default instance in Amazon EC2 is m3.medium which is NOT SUPPORTED for the Wowza Streaming Cloud (DevPay) license.
The EC2 instance type most suitable and least expensive for basic testing is t1.small.
A complete list of Wowza-compatible EC2 instances is here: www.wowza.com/forums/content.php?71.
-
A detailed Wowza EC2 user guide is available here: www.wowza.com/resources/WowzaStreamingEngineforEC2_UsersGuide.pdf.
MainConcept AAC Encoder
In order to be compatible with Roku players the live stream must have its audio
encoded as AAC instead of the encoder default of MP3.
If you installed Flash Media Live Encoder (FMLE)
on a Mac encoding workstation or laptop then you already
have an AAC encoder available as part of the Mac OS,
and AAC is available as an FMLE Audio Format option.
If you installed FMLE on a Windows encoding workstation or laptop then you will need
to purchase an AAC plug-in for FMLE because
Windows does not include a built-in AAC encoder.
Windows-based systems without the AAC encoder plug-in installed will
only have MP3 available as an Audio Format option.
The cost for the encoder plug-in that adds the Audio Format AAC option is $180.
Without AAC encoding live streams may not play at all on earlier model Roku players
and some players may have very long buffering times and no audio.
Skip the following steps if you are using a Mac-based encoding workstation or laptop.
-
Browse to www.mainconcept.com
and click on the APPS & PLUG-INS button.
-
Locate and click on the AAC ENCODER button.
-
Click the BUY NOW button to purchase the AAC Encoder plug-in.
-
Follow the on-screen directions to complete payment and download the plug-in.
-
After payment is complete you will be provided with a registration code.
The code will be used during the plug-in installation process to activate it.
Without the registration code the AAC Encoder plug-in will only function for 30 seconds.
-
Click on the AAC Encoder installation executable and follow the on-screen instructions,
replacing the default DEMO registration code with the code that was just purchased.
-
After the AAC Encoder installation is complete,
restart Flash Media Live Encoder and verify that AAC is available
as an Audio Format option.
Flash Media Live Encoder
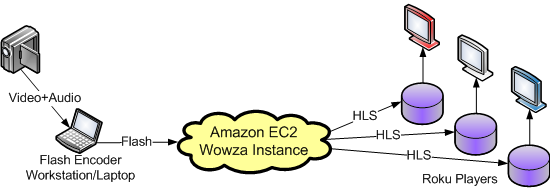
As shown in the diagram at the top of this page,
the encoder will be used to convert video and audio signals from a camera or webcam into a Flash stream suitable to be sent to the Wowza EC2 instance.
-
Start up Adobe Flash Media Live Encoder on your workstation or laptop.
-
Configure the video input:
-
Make sure that the Video checkbox is checked.
-
Device: Usually a camera or webcam.
-
Format: H264
-
Frame Rate: 29.97 or 30.00
-
Input Size: Image input size, varies depending on camera or webcam driver.
-
Bit Rate: Channel bandwidth, do not to exceed your upstream Internet bandwidth.
-
Output Size: Image output size displayed on the Roku channel.
Larger output sizes require larger bit rates to avoid compression artifacts.
-
Configure the audio input:
-
Make sure that the Audio checkbox is checked.
-
Device: Usually the microphone built into the camera or webcam.
-
Format: AAC
-
Channels: Stereo
-
Sample Rate: 44100
-
Bit Rate: 96
-
Volume: Reduce to avoid feedback if testing with the camera and Roku player in the same room.
-
Configure the Flash Media Server connection:
-
Make sure that the Stream to Flash Media Server checkbox is checked.
-
Enter the FMS URL as rtmp://address/live,
substituting the EC2 instance's public domain name (or IP address) previously saved in place of
address.
-
Enter itvc as the name of the Stream.
This can be changed to something else later,
and is used to distinguish between multiple streams
being provided by the same Wowza instance.
-
Click the Connect button.
-
If a Wowza instance is found
the Connect to FMS panel is displayed.
If the Connect to FMS panel is not displayed,
check that the public domain name (or IP address) entered for the FMS URL is correct,
and use the Wowza Stream Engine Manager to verify that the Wowza instance is running.
-
Enter wowza as the Username.
-
Enter the previously saved EC2 Instance ID as the password.
-
Click OK.
-
Click the large green Start button.
The encoder is now streaming live video to the Wowza server instance.
Edit the Roku Channel
Add a live stream program to the test Roku channel:
-
Log into your Instant TV Channel account.
-
From the menu along the left side of the page, select Channels.
-
Select a channel to add the live program to,
or create a new channel.
-
From the menu along the left side of the page, select Content.
-
Right-click on any folder

 in the content tree in the upper-left window
and add a New Video or Audio
in the content tree in the upper-left window
and add a New Video or Audio  item.
item.
-
In the lower window,
locate the Live Program Parameter and change it to True.
-
In the lower window,
locate the Stream 1 - URL Program Parameter and change it to
http://address:1935/live/itvc/playlist.m3u8
substituting the EC2 instance's public domain name (or IP address) previously saved in place of
address.
-
In the lower window,
locate the StreamFormat Program Parameter and change it to hls.
-
Change both the Title and ShortDescriptionLine1
parameters to "Live Stream Test"
Finally!
The live stream is ready to play.
Re-start the test channel on a Roku player
and select the Live Stream Test program.
Important:
Because your Wowza server instance is now running,
your Amazon AWS account is being billed for
each hour that the instance is running, whether or not you are streaming anything.
Make sure that you terminate the Wowza instance
when you are done with this walk-through
in order to avoid unnecessary charges to your AWS account.
Your AWS account will continue to be billed monthly for the Wowza license if you are not using the free trial.
To terminate the EC2 Wowza instance:
-
Enter the EC2 section of your Amazon AWS account.
-
Click the Instances link from the left-side Navigation panel.
-
Locate and right-click anywhere on row containing the Wowza instance details
and select Instance State - Terminate.
-
Click the Yes, Terminate button.
DISCLAIMER: Instant TV Channel cannot guarantee that the information
on this page is accurate or complete,
nor can it guarantee
the availability of services,
pricing,
or compatibility
of Amazon, ScaleEngine, Wowza or any other service or software provider.
- o -
Please see this
walk-through
for more information about how to quickly build a Roku channel using Instant TV Channel.
Questions and comments about this Roku developer walk-through can be forwarded to .